Turf
RETENTIS® for new lawns, existing turf, and sod – water less, enjoy more
RETENTIS® for lush green growth
RETENTIS® makes your lawn—whether newly seeded, established turf, or sod—more resilient and consistently lush green.
With just a few simple steps, the 100% natural, wood-based granulate increases your soil’s moisture-holding capacity by up to 10 liters of water per kilogram of RETENTIS® and can reduce watering needs by up to 40%.During dry periods, RETENTIS® releases moisture and nutrients to the roots as needed, promotes healthy root development, and delivers vibrant, dense growth. Over time, RETENTIS® transforms into nutrient-rich humus, sustainably improving soil structure and fertility for long-lasting results.
Typical Applications & Dosages
New Lawn / Overseeding
100 g / m² (work in dry, approx. 10 cm deep)
Existing Lawn
20–40 g / m² (mix with sand for aeration)
Sod (Roll Turf)
100 g / m² (work in dry, approx. 10 cm deep)
Tip: Apply fertilizer at the same time!
Mix your trusted fertilizer directly with RETENTIS®. It binds nutrients and releases them steadily to the plant roots over several weeks—no leaching, no nutrient shock.
🧮 Calculate the exact amount for your project using the RETENTIS®Calc tools below.
10 days of drought stress. A clear difference.
Two identical lawn samples after 10 days without irrigation:
On the left, the untreated control shows clear signs of drought stress; on the right, the lawn treated with RETENTIS®. Thanks to the soil’s high water-retention capacity, the RETENTIS® lawn remains noticeably more vigorous and greener.
New Lawn Installation
100 g / m²
A successful new lawn starts with proper soil preparation and high-quality materials. With RETENTIS®, the soil gains a significantly higher capacity to store water and nutrients, providing young grasses with optimal starting conditions. The result is a dense, green lawn within just a few weeks—establishing healthily and requiring less irrigation over time.
Collapsible content
Why is RETENTIS® incorporated before sowing?
RETENTIS® stores water exactly where seedlings develop their roots. This keeps the topsoil evenly moist, accelerating germination and ensuring more uniform growth. Without sufficient moisture, gaps can quickly form in a newly seeded lawn.
How much RETENTIS® do I need for a new lawn?
For new lawn areas, approximately 100 g/m² are incorporated into the topsoil layer (10–15 cm). This amount ensures optimal water and nutrient buffering during germination and subsequent growth.
Does RETENTIS® reduce irrigation requirements after lawn establishment?
Yes, significantly. The soil’s water storage capacity increases noticeably, allowing the young lawn to remain moist for longer. This is especially important during the sensitive germination phase, supporting uniform development and reducing the required irrigation frequency.
Step-by-step guide for establishing a new lawn with RETENTIS®
The following steps show how to properly establish a new lawn and how RETENTIS® supports optimal soil moisture, improved germination, and uniform growth. From soil preparation to initial maintenance, this creates a stable foundation for a dense and long-lasting healthy lawn.
Collapsible content
Step 1: Prepare the soil
The area is thoroughly cleared of existing vegetation, with old turf and weeds removed. The soil is then loosened deeply and cleared of stones and root residues. Depending on soil type, sand is incorporated to improve drainage, or humus and RETENTIS® are added to increase water storage capacity. Finally, the soil is leveled and finely raked to ensure a smooth surface without bumps or depressions.
Step 2: Create a fine seedbed, incorporate RETENTIS®, and cover
The prepared soil is finely raked and lightly compacted. RETENTIS® is then evenly applied at approximately 100 g/m², optionally together with a starter fertilizer. Light raking incorporates the material into the topsoil layer (10–15 cm). A 1–2 cm layer of substrate is then applied, ensuring that RETENTIS® is fully covered and protected below the surface. Finally, the area is moistened to activate RETENTIS® and create optimal conditions for sowing.
Step 3: Sow the seed
On a calm, dry day, the surface is lightly loosened again. The lawn seed is evenly distributed by hand or applied using a spreader. The soil is then rolled lengthwise and crosswise to ensure good seed-to-soil contact and promote uniform germination.
Step 4: Water and support the germination phase
Immediately after sowing, the area is thoroughly watered. In the following weeks, the soil must not be allowed to dry out, as young grasses are highly sensitive. With RETENTIS®, moisture remains longer in the root zone, allowing irrigation to be applied less frequently.
Step 5: Care during the first weeks
After six to eight weeks, when the new lawn has reached a height of five to ten centimeters, the first mowing is carried out. Immediately afterward, a slow-release fertilizer is applied to promote the rapid development of a dense and resilient turf.
Existing lawn area
Existing lawn – aeration
20 g per liter of quartz sand
The recommended application rate for incorporating RETENTIS® into existing lawns is 20–40 g/m². RETENTIS® is mixed directly into the quartz sand used to fill the aeration holes, at a ratio of approximately 20 g RETENTIS® per liter of quartz sand. The mixture is then applied exclusively into the aeration holes and not spread on the surface.
Collapsible content
How many holes are created per square meter during aeration?
Depending on the equipment used (hollow tines), approximately 100–200 holes per square meter are created. A typical hollow tine has a diameter of about 1.2 centimeters and penetrates the soil to a depth of approximately 12 centimeters.
What is the total volume created by the aeration holes?
Based on the size and depth of the holes, each hole has a volume of approximately 0.01 liters. This results in a total fill volume of about 1–2 liters per square meter.
How is the application rate of 20–40 g of RETENTIS® per square meter derived from this?
About 20 g of RETENTIS® are mixed per liter of quartz sand. Since 1–2 liters of fill volume are created per square meter, this automatically results in an application rate of approximately 20–40 g of RETENTIS® per square meter.
Step-by-step guide for existing lawn areas with RETENTIS®
An existing lawn can be specifically improved by aeration and incorporating RETENTIS®. The treatment loosens compacted soil, increases water retention, and supports root development. The following steps show how to apply RETENTIS® correctly into the aeration holes, helping the lawn become noticeably more vigorous, denser, and more resilient.
Collapsible content
Step 1: Prepare the lawn
Mowing
The lawn is mown short, ideally to a height of two to three centimeters. Leaves, clippings, and loose plant debris are completely removed. The surface should be dry to slightly dry to ensure clean aeration and to prevent soil smearing.
Optional: Scarifying
During scarification, thatch is removed and the upper vegetation layer is vertically cut to a depth of 3–5 mm. This shortens horizontally growing shoots and prepares the lawn optimally for aeration. After scarifying, a considerable amount of organic material usually remains on the surface and should be removed. A lawn aerator is ideal for this purpose, as it removes remaining thatch and dead plant material left in and on the turf after scarification.
Step 2: Aerate the lawn
Using an aeration machine with hollow tines, approximately 100–200 holes per square meter are punched into the soil. The tines typically have a diameter of about 1.2 centimeters and penetrate the ground to a depth of approximately 12 centimeters.
Step 3: Mix quartz sand and RETENTIS®
A mixture of dry quartz sand and RETENTIS® is prepared to fill the aeration holes. Approximately 20 g of RETENTIS® per liter of quartz sand are mixed in. Depending on the number and depth of the holes, about 1–2 liters of sand mixture per square meter are required, resulting in an application rate of approximately 20–40 g of RETENTIS® per square meter. The mixture should be thoroughly blended on site to ensure even distribution of RETENTIS® in the sand.
The use of quartz sand is essential, as its sharp-edged grains do not compact. Suitable grain sizes range from 0–2 mm.
Step 4: Fill the aeration holes
The sand–RETENTIS® mixture is spread over the surface and worked into the aeration holes using a lawn leveler, screed board, or a coarse broom. The goal is to fill the holes as completely as possible while leaving minimal material on the surface. It is important that RETENTIS® does not remain as a layer on top of the lawn, but is fully incorporated into the soil within the holes.
Step 5: Level the surface and water the lawn
Finally, the lawn is thoroughly watered so that RETENTIS® can absorb and store water in the root zone. In the following days, the area should be watered normally but not excessively. With RETENTIS®, moisture remains in the soil for longer, encouraging deeper root growth and making the lawn more resilient to dry periods.
Sod lawn
100 g/m²
For laying sod, RETENTIS® is incorporated into the fine-graded soil at a rate of 100 g/m². The leveled and rolled surface is lightly raked so that the granulate is evenly worked into the topsoil layer (approximately 5–10 cm). A starter fertilizer can be applied together with RETENTIS® at this stage. After raking, the area should be moistened to activate RETENTIS® and ensure optimal establishment of the sod.
Collapsible content
Why are 100 grams of RETENTIS® per square meter recommended?
This amount ensures that the upper soil layers can store sufficient moisture, which is exactly where newly laid sod develops new roots. The application rate is designed so that RETENTIS® acts evenly without altering the soil structure.
Why is RETENTIS® incorporated into the fine-graded soil rather than applied to the surface?
By lightly raking, the material is worked into the active soil layers directly beneath the sod. There it can store water and release it to the roots. Surface application would be less effective, as the granulate would not reach the zone where new roots develop.
Why does the soil need to be moistened after incorporating RETENTIS®?
RETENTIS® requires water to become activated and fully develop its water storage capacity. Moistening the soil ensures uniform hydration, allowing the sod to establish more quickly and form a stable connection with the underlying soil.
Step-by-step guide for sod with RETENTIS®
Sod can be installed quickly and reliably, but proper preparation is crucial for quality, establishment, and long-term maintenance. With RETENTIS®, the soil is optimally conditioned, stores significantly more moisture, and provides ideal starting conditions for newly laid sod. The following steps show how to properly prepare, install, and care for sod so it remains dense, green, and resilient over the long term.
Collapsible content
Step 1: Soil preparation
The future lawn area is completely cleared of existing vegetation. Weeds and old turf are removed, either with a sod cutter or by hand. The soil is then loosened deeply, and stones and root residues are removed. For heavy, clay-rich soils, sand should be incorporated to improve drainage. For very light, sandy soils, adding humus and RETENTIS® is recommended to increase water retention.
Step 2: Create the fine grade and incorporate RETENTIS®
The area is carefully raked until no bumps or depressions remain and then compacted with a roller. RETENTIS® is applied at approximately 100 g/m², ideally using a spreader; a starter fertilizer can be applied at the same time. The rolled surface is then lightly raked to incorporate RETENTIS® and the fertilizer into the topsoil and to eliminate any remaining unevenness. The soil level should be slightly below the final turf surface. Finally, the entire area is moistened to activate RETENTIS® and create optimal starting conditions for the sod.
Step 3: Lay the sod
The subsoil should be evenly moist. Installation begins in one corner, laying the sod strip by strip with tight joints. A slight stagger helps prevent visible seams later on. The sod can be cleanly trimmed with a knife. Boards can be used when working on already laid areas to avoid footprints. After installation, the surface is rolled again to ensure good root-to-soil contact.
Step 4: Water and allow establishment
Immediately after installation, the lawn is thoroughly and deeply watered, using approximately 15–20 liters per square meter. During the first two weeks, both the turf and the soil must remain consistently moist. After about fourteen days, the sod is established and irrigation can be gradually reduced. With RETENTIS®, overall irrigation requirements are significantly reduced.
Step 5: Mowing and maintenance
Once the lawn reaches a height of 6–7 cm, the first mowing can be carried out. For recreational lawns, the cutting height should be about 3.5–4 cm, while shaded lawns are best cut to 5–6 cm. Sharp mower blades are essential. Regular mowing promotes dense and even growth. After approximately 14 days, the lawn can be used lightly, and after about four weeks it is fully resilient.
Step 6: Fertilizing
Four to six weeks after installation, the lawn should be fertilized for the first time. A high-quality lawn fertilizer should be applied as evenly as possible to promote uniform, vigorous green growth. RETENTIS® reduces fertilizer requirements by storing nutrients, releasing them gradually, and minimizing leaching.
RETENTIS®-Calc
The RETENTIS® Calc tools provide the perfect dosage and the right packaging size in seconds. Simply enter the square meters in the RETENTIS® Calc under the application area “Surface” and get started.
Why RETENTIS®
Stores up to 10 liters of water per kilogram of granulate and releases it back to plants during dry periods.
💦 Saves up to 40% irrigation water.
⏳ Effective in the soil for 3–5 years, completely free of microplastics.
🍂 Promotes humus formation and improves soil structure.
⚖️ pH-neutral – RETENTIS® does not alter soil pH and can be mixed with other soil amendments.
✅ Approved for organic farming.
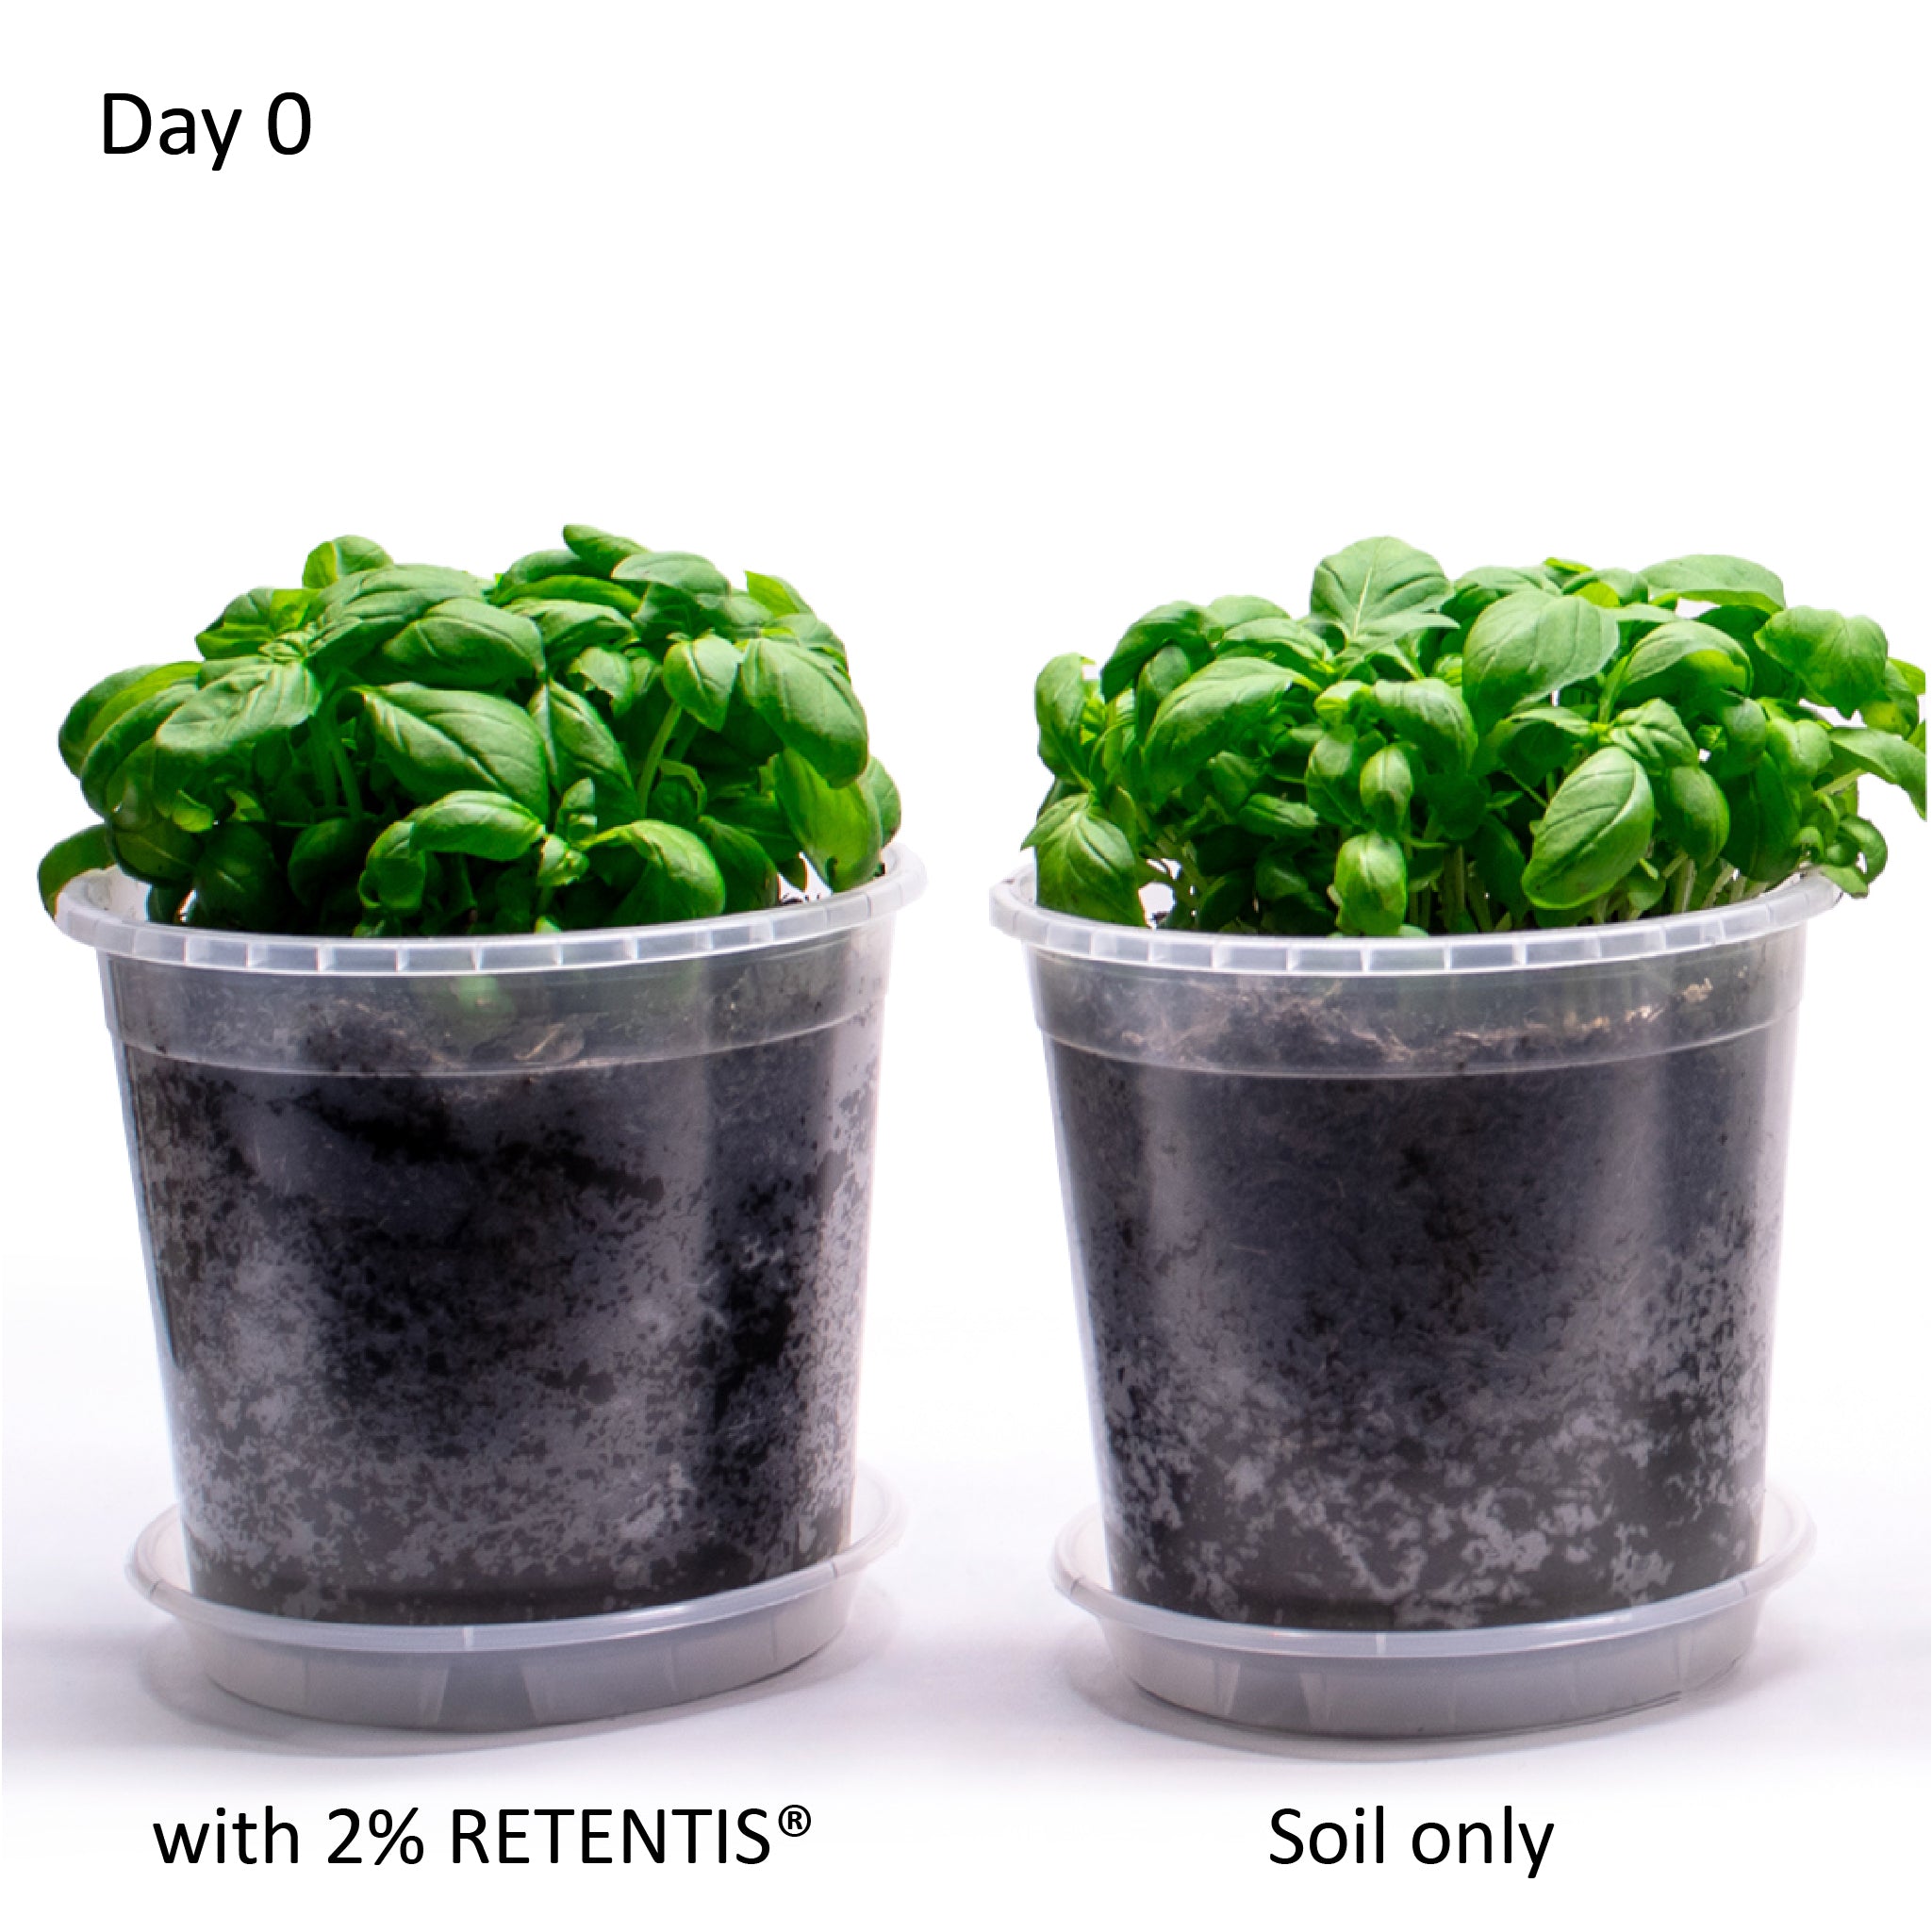
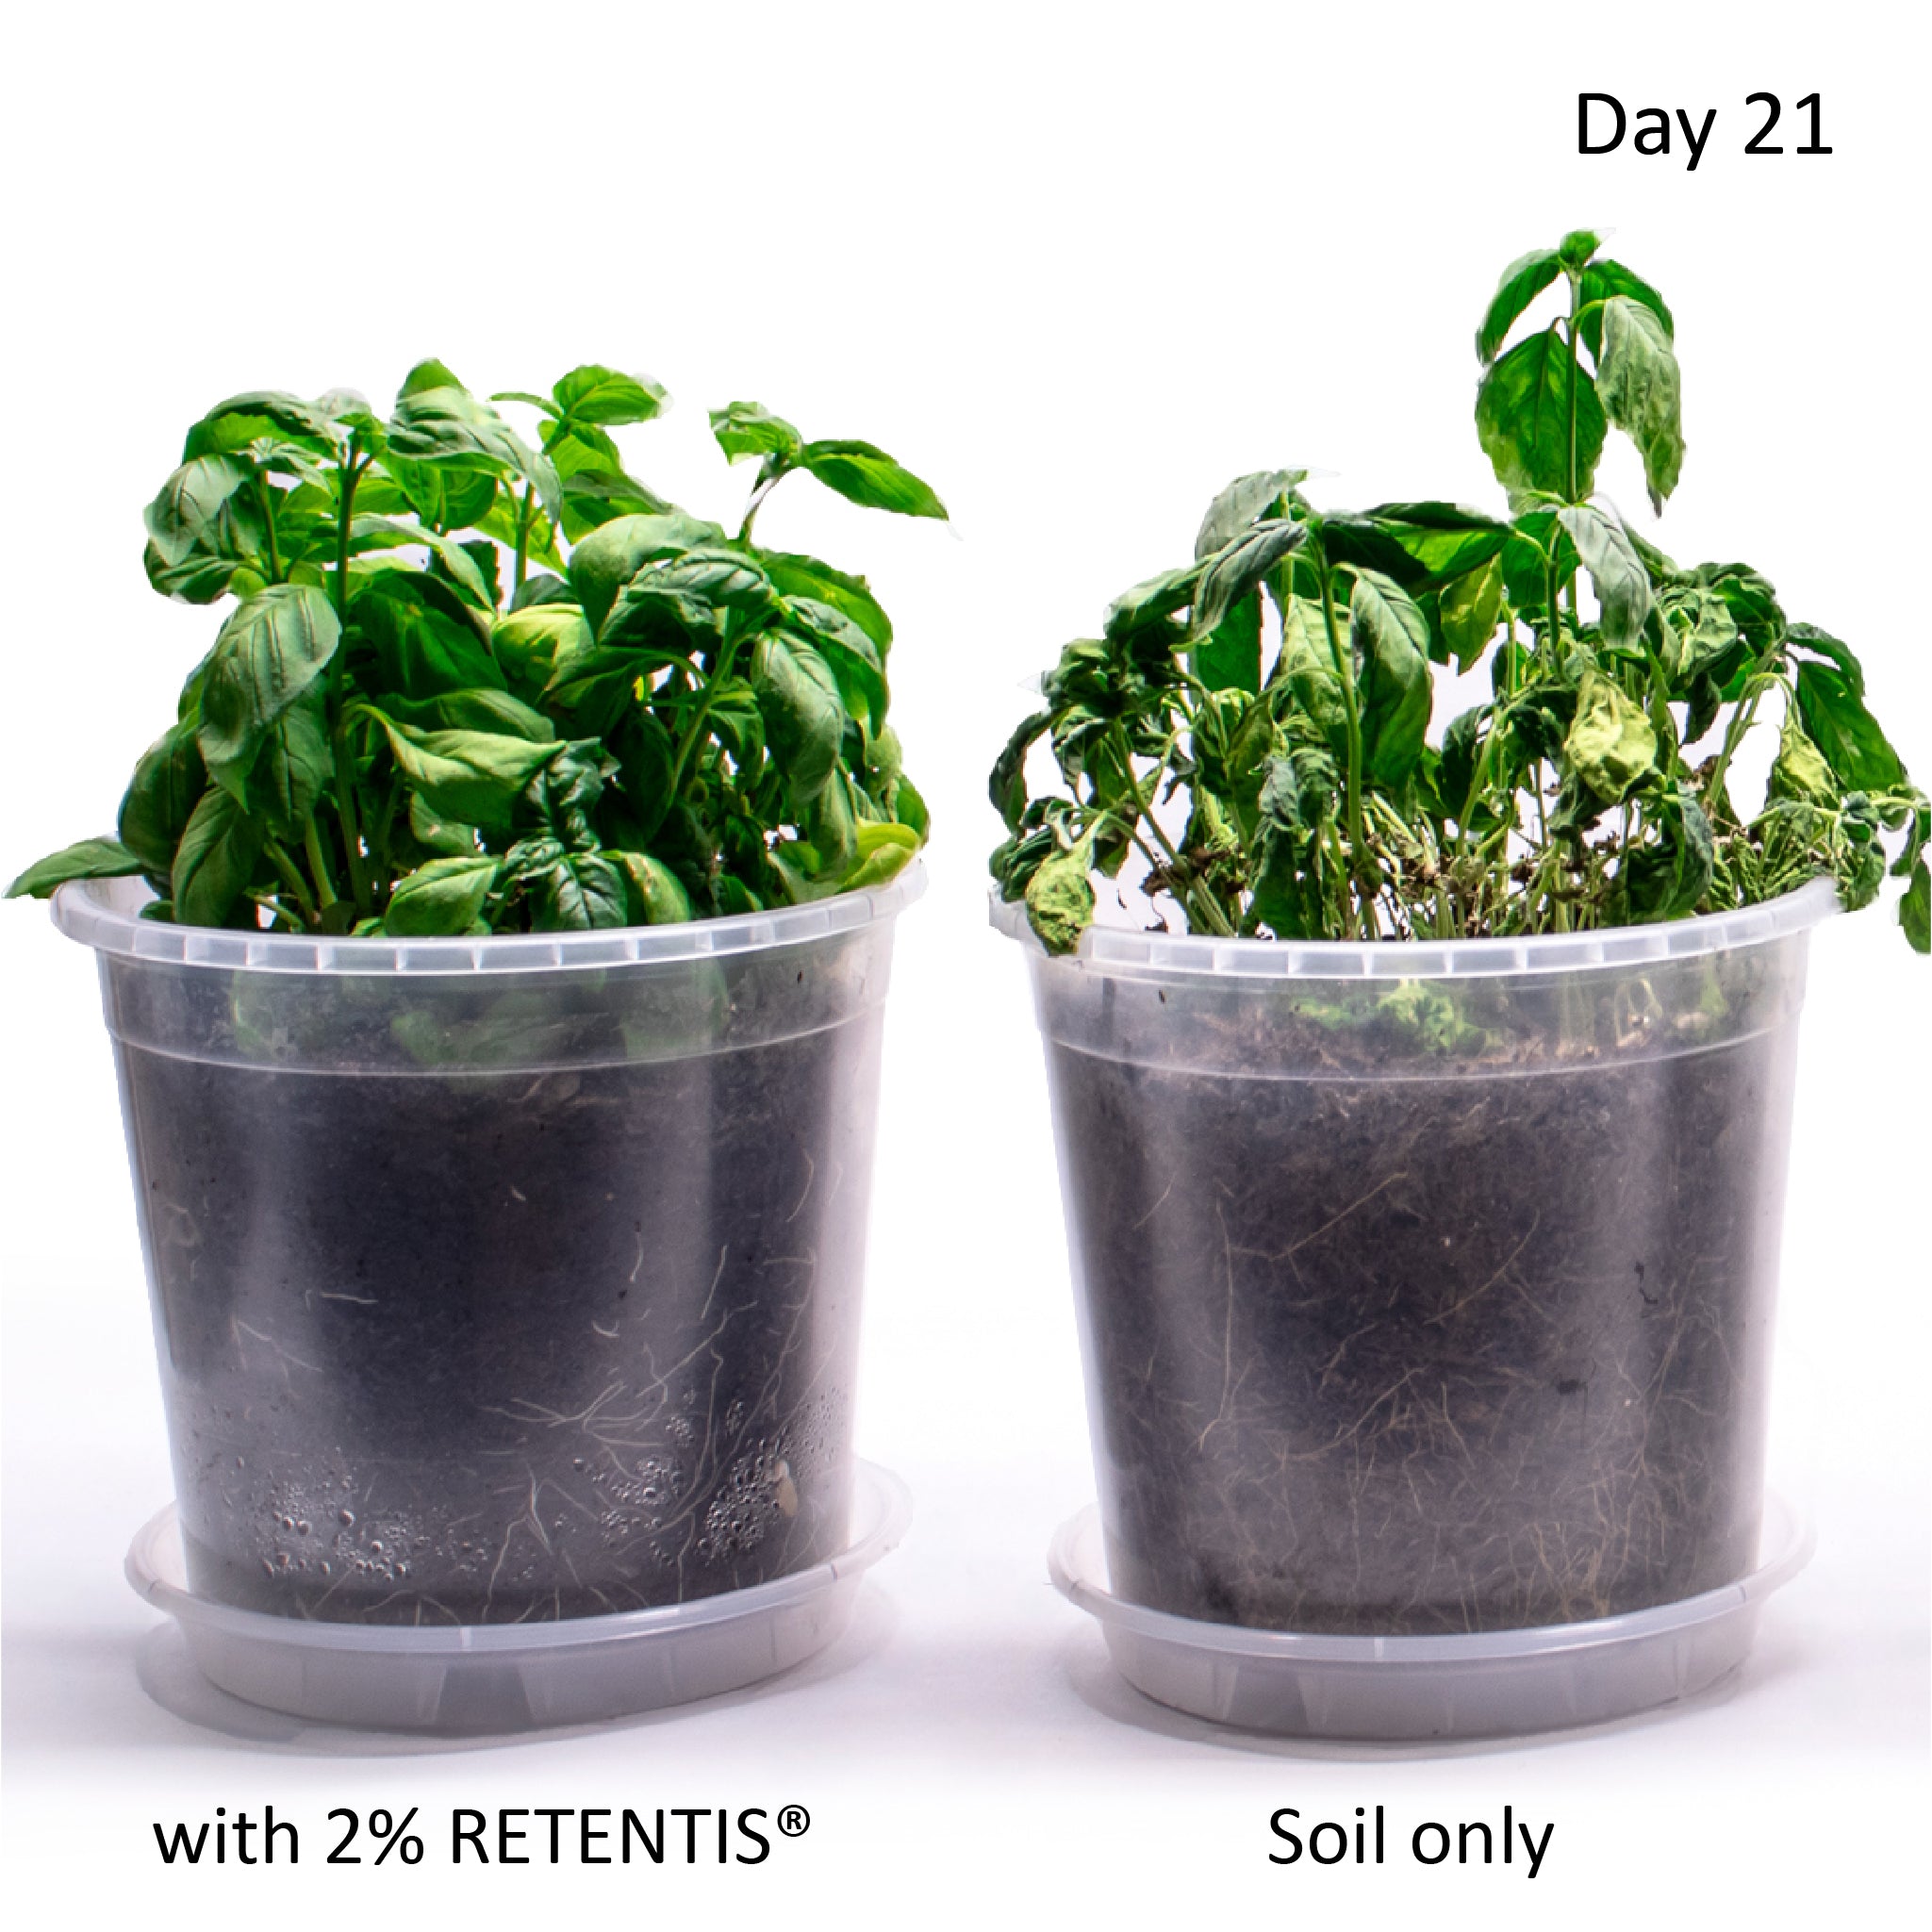
Image: Basil after 3 weeks without irrigation, left with 2% RETENTIS®, right with soil only. Move the slider to see the difference
Further areas of application
Discover additional applications for RETENTIS® and find the perfect solution for your project.